

How to Store Graphic T-Shirts to Prevent Wrinkles
Table of Contents
- Why Graphic T-Shirts Wrinkle Differently Than Plain Tees
- How to Wash Graphic Tees to Last
- Best Way to Fold Graphic T-Shirts
- How to Hang T-Shirts Without Stretching the Neck
- How to Remove Wrinkles from Graphic Tees Without an Iron
- How to Store Graphic T-Shirts in Drawers and on Shelves
- Long-Term Storage: Bins, Moisture Control, and Graphic Print Protection
- Packing Graphic T-Shirts for Travel Without Creases
- Conclusion
- Frequently Asked Questions
Last Updated: September 11, 2026
Why Graphic T-Shirts Wrinkle Differently Than Plain Tees
Graphic tees crease along different fault lines than a plain cotton tee, because the printed area behaves like a separate material bonded to the fabric. That print layer adds stiffness, traps heat against the cotton underneath, and resists folding the way bare knit does. The result: a shirt that looks fine flat and looks wrecked the moment you pull it from a drawer.
Here's what most guides get wrong. They tell you to fold, hang, or roll without ever asking what the print is made of. A screen-printed design and a soft heat-transfer print respond to tension, moisture, and pressure in completely different ways, and a storage method that protects one can slowly destroy the other.
Wrinkle prevention for printed apparel starts with three variables you actually control:
- Fiber stress, knit cotton stretches and creases when folded against a rigid print edge
- Moisture, trapped humidity softens the print and lets cotton fibers set into sharp folds
- Compression, weight stacked on top of a printed panel leaves permanent crease lines
Ortrends ships made-to-order graphic apparel from California. The short version: treat the print as the fragile part and the cotton as the durable part. Everything below follows from that one idea.
American Cleaning Institute fabric care guidance
How to Wash Graphic Tees to Last
Most print damage happens in the wash, not in the drawer. Wash graphic tees inside out in cold water on a gentle cycle, and skip the dryer entirely (cleaninginstitute.org). That single change prevents more cracking, fading, and edge-lifting than any storage trick.
Washing Inside Out and Cold Water Rules
Turn the shirt inside out before it touches the machine. This puts the cotton between your print and everything else in the drum, so zippers, buttons, and agitator friction hit fabric instead of ink.
Cold water protects the print in two ways. Heat breaks down the binder that holds ink to cotton, and hot water makes fibers swell and shift under the print. Cold keeps both stable.
A common mistake is overloading the machine. A packed drum increases friction and tension across every garment. Wash graphic tees in smaller loads, use a gentle or delicate cycle, and measure detergent rather than pouring freely. Fabric softener is worth skipping on printed shirts; it leaves a residue that can dull a print over time.
Drying Flat to Prevent Print Damage
Dry graphic tees flat or hang them to air dry. If you must use a machine, choose the lowest heat setting and pull the shirt out while it's still slightly damp.
Heat is the enemy here. A hot dryer doesn't just shrink cotton; it can cause a print to crack along fold lines and lift at the edges. Lay the shirt flat on a clean towel, smooth the print with your palm, and let it dry away from direct sun. Sun exposure fades ink the same way it fades upholstery.
Best Way to Fold Graphic T-Shirts
The best way to fold graphic t-shirts is to fold along the shirt's natural seams rather than across the printed panel, keeping the design flat and unpressed. Two methods handle almost every situation: the cuff tuck for a clean shelf edge, and the ranger roll for tight spaces.
The Cuff Tuck Method for a Straight Edge
Lay the shirt face down on a flat surface and smooth it with your hands. Fold one side toward the center, then the other, so the shirt forms a long rectangle. Now tuck the bottom hem cuff up and over the folded body, roughly a third of the way. That cuff tuck locks the fold in place and gives you a straight edge that stacks cleanly.
The payoff is a shirt that holds its shape without pins, clips, or a folding board. It also means the print sits on the outside of the bundle, not crushed against itself.
The Ranger Roll for Space-Saving Storage
The ranger roll is the tightest fold for drawers, duffel bags, and storage bins. Lay the shirt face down, fold both sleeves inward, then fold the shirt in half lengthwise. Starting at the collar, roll tightly toward the hem, keeping tension even across the width.
Even tension is the whole trick. Roll too loose and the shirt unspools; roll too tight and you stretch the knit and stress the print. Aim for a firm, uniform cylinder. Rolled shirts stand upright in a drawer and take up far less depth than folded stacks.
| Method | Best For | Space Used | Print Risk |
|---|---|---|---|
| Cuff tuck fold | Shelf and drawer stacks | Medium | Low |
| Ranger roll | Travel, bins, tight drawers | Low | Low |
| Hanging | Wrinkle-prone fabrics | High | Medium |
| Flat pack | Long-term storage | Medium | Lowest |
How to Hang T-Shirts Without Stretching the Neck
Hanging is the right call for some graphic tees and the wrong call for others, and the deciding factor is the print, not the fabric. A plain heavyweight cotton tee hangs beautifully. A thin vintage-wash tee with a large screen-printed chest panel can stretch at the shoulders under its own weight and leave the print draping against itself, which is how ink-to-ink contact starts.
Use this rule: hang when the shirt is light, the print is small, and the closet has room. Fold when the shirt is heavy, the print covers the chest, or the closet is crowded.
Choosing Padded Hangers and Proper Hanger Tension
Hanger material matters more for printed shirts than most guides admit. Here is how the common options actually behave:
- Velvet-flocked hangers grip the shoulder gently and hold thin knits in place without shoulder bumps. They are the safest default for lightweight graphic tees.
- Padded or satin-covered hangers distribute weight across the shoulder and won't snag a print, but they can be bulky in a tight closet.
- Wide-shoulder wooden hangers work well for heavyweight cotton and streetwear-weight tees, but the wood can leave a faint line if the shirt hangs for months.
- Plastic tube hangers concentrate pressure at two thin points and leave shoulder bumps on anything heavier than a tissue-weight tee.
- Thin wire hangers are the worst option for knits. They concentrate load, rust over time in humid closets, and can leave a permanent crease along the shoulder seam.
Whatever you choose, keep the hanger tension light. The shirt should rest on the hanger, not grip it. If you can see the shoulder fabric pulling upward toward the hanger, the hanger is too narrow for that shirt.
Hanging Graphic Tees Without Print-on-Print Contact
For graphic tees specifically, the goal is to keep the printed panel from pressing against anything, including itself. Two techniques handle this:
The fold-over-bar method. Fold the shirt in half vertically with the print facing outward, then drape it over the hanger bar so the design hangs on the outside of the fold. This keeps the print visible, prevents ink-to-ink contact, and works well for shirts with a large chest or back print. The trade-off is that the fold line runs down the center of the shirt, so reserve this method for shirts you wear often and steam lightly before wearing.
The shoulder-hang method with a print gap. Hang the shirt normally by the shoulders, but leave a finger's width of space on either side. Crowding, not gravity, is what creates most closet creases. Shirts pressed against each other for weeks develop fold lines along whatever edge they touch.
A few more rules that hold up in practice:
- Hang shirts with the print facing outward so you can identify them without pulling them off the bar
- Keep similar weights together; a heavy hoodie hanging against a thin tee will press a crease into the lighter shirt
- Rotate hanging shirts every few months if they are stored long-term, so the same shoulder points don't carry load indefinitely
- Avoid hanging a shirt by the collar; the neckline will stretch and rarely recovers
How to Remove Wrinkles from Graphic Tees Without an Iron
A hand steamer removes wrinkles from graphic tees safely, and a steamy bathroom handles light creases in a pinch. Both methods use moisture and gentle heat instead of direct contact, which is exactly what a printed panel needs.
Hold the steamer a few inches from the fabric and let the steam do the work. Don't press the head against the print. Work from the top of the shirt downward, smoothing the fabric with your free hand as you go, and let the shirt hang for a minute before wearing it.
For the shower steam technique, hang the shirt on a hanger in the bathroom while you take a hot shower. Close the door so the steam builds. Twenty minutes of ambient steam relaxes most light creases. This won't fix a shirt that's been crushed in a bin for months, but it handles the everyday stuff.
University of Missouri Extension guide to fabric care
How to Store Graphic T-Shirts in Drawers and on Shelves
Store graphic t-shirts upright in drawers and face-out on shelves so you can see and grab one without disturbing the rest. Vertical storage is the single biggest upgrade most people can make to a drawer, and it costs nothing. But the method that protects a heavyweight streetwear tee is not the same method that protects a thin vintage-wash shirt with a soft heat-transfer print, and most guides skip that distinction entirely.
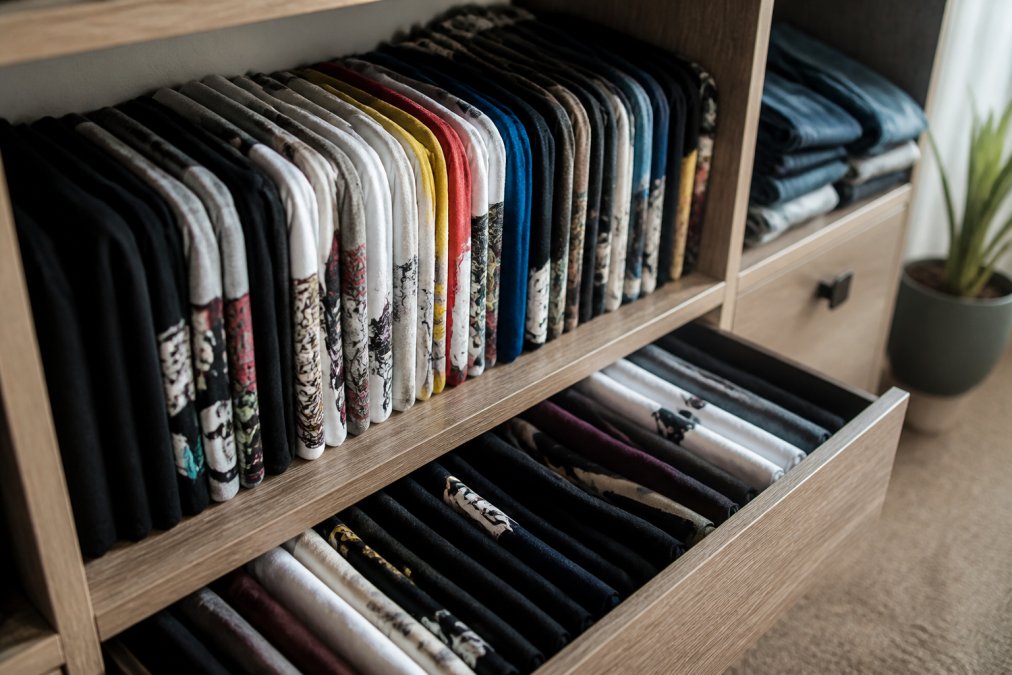
Vertical Storage and Shelf Storage Layouts
Vertical storage means filing shirts like folders instead of stacking them like pancakes. Roll or cuff-tuck each shirt, then stand them side by side so the folded edge faces up. You pull one out without lifting the others, which means no re-folding and no fresh creases.
For shelf storage, fold each shirt to a consistent width and stack no more than four or five high. Weight is what leaves crease lines, so a tall stack is a slow-motion wrinkle generator. Face the prints outward so you can identify a shirt at a glance.
A few layout rules that hold up in practice:
- Keep similar weights together; heavy hoodies shouldn't sit on lightweight tees
- Leave a little breathing room between stacks so air can move
- Put the shirts you wear most at eye level and rotate the rest
- Avoid wire shelving, which can leave grid marks on soft cotton
Matching Storage Method to Fabric and Print Type
This is the part most guides leave out. The right storage method depends on what the shirt is made of and how the print was applied.
Heavyweight cotton and streetwear-weight tees (roughly 6 oz and up). These shirts hold a fold well and resist creasing under moderate weight. Cuff-tuck folding in a vertical drawer works, and a stack of four or five is fine. The risk here is not wrinkles, it is print cracking along fold lines if the shirt is folded directly across a thick screen-printed panel. Fold along the shirt's natural seams, not across the design.
Mid-weight cotton and cotton-poly blends (roughly 4.5 to 5.5 oz). These are the most forgiving shirts to store. Vertical drawer storage or a short shelf stack both work. Poly blend content helps the shirt release wrinkles on its own, so a slightly imperfect fold will hang out within an hour of wearing.
Thin vintage-wash and lightweight tees (roughly 4 oz and under). These are the shirts that crease permanently if you look at them wrong. Store them rolled, not folded, and give them their own drawer or shelf section so heavier shirts never rest on top. A single heavyweight tee stacked on a thin vintage shirt for a month can leave a crease line that survives washing.
Soft heat-transfer and DTG prints. These prints sit on top of the fabric rather than bonding into it, so they are more prone to sticking to whatever they touch. Store these shirts with the print facing outward and nothing pressing against the design. If you must stack them, interleave a sheet of acid-free tissue paper between the print and the shirt above it.
Screen-printed designs with heavy ink laydown. Thick ink deposits crack along sharp fold lines over time. Roll these shirts rather than folding them across the print, and avoid stacking anything on top of the printed panel.
Drawer Depth and Shelf Height Checks
Two measurements prevent most storage damage, and almost nobody checks them:
- Drawer depth. A drawer deeper than about 14 inches encourages you to stack shirts front-to-back instead of standing them upright. If your drawer is deeper than that, use a drawer divider or a shallow insert tray to create a back row and a front row.
- Shelf clearance. Leave at least two inches of clearance between the top of a shirt stack and the shelf above it. Shirts pressed against a shelf for months develop a crease along the contact line.
That's the everyday system. What follows is the version for shirts you won't touch for months.
Long-Term Storage: Bins, Moisture Control, and Graphic Print Protection
Long-term storage is where graphic tees quietly fail. Bins, moisture, and print protection are the three levers, and getting them right is the difference between a shirt that looks new next season and one that's cracked and yellowed.
Choose storage bins that breathe or that seal completely, but don't mix the two approaches. A breathable cotton or canvas bin lets air circulate and prevents mustiness. A sealed plastic bin keeps out moisture and pests, but only if the shirts inside are bone dry. Trapping a slightly damp shirt in a sealed bin is how mildew starts.
Moisture control matters more than most people expect. Add a silica gel packet or a moisture absorber to sealed bins, and store them somewhere with stable temperature. Garages and attics swing between damp and dry, which is hard on both cotton and ink. A closet shelf or under-bed space is a better home.
For the print itself, layer shirts so no printed panel rests directly against another printed panel. Ink against ink under weight can transfer or stick. Interleave with acid-free tissue paper if you're storing something you care about, and fold so the design faces outward with nothing pressing on it.
Packing Graphic T-Shirts for Travel Without Creases
Pack graphic tees rolled, not folded flat, and place them at the center of the bag where compression is lowest. Rolling eliminates the sharp fold lines that flat packing creates, and keeping shirts away from the bag's edges protects the print from zipper pressure.
Layer in this order: shoes and hard items at the bottom, then a layer of rolled shirts, then soft items on top. If you're using packing cubes, roll shirts into the cube and pack cubes snugly so nothing shifts. Loose items in a bag rub against each other, and friction is what lifts print edges.
For a suit-style flat pack when you need a shirt to arrive crisp, use the cuff tuck fold and place the shirt flat at the top of the bag, print facing up, with nothing stacked on it. This is the flat pack approach and it works well for one or two shirts, less well for a week's worth.
One more thing worth knowing: unpack as soon as you arrive. A shirt that sits compressed for days sets into whatever shape it was packed in.
Conclusion
Storing graphic tees well comes down to respecting the print. Cold washes, air drying, folds that avoid the design, and storage that's dry and uncompressed will keep a shirt looking new far longer than any single trick.
Ortrends builds apparel around that same idea. Every design is made to order with premium materials, original prints, and the kind of durability that survives real wear and real storage. Whether you're shopping for a nurse, a pet lover, or someone who just wants a design that means something, our collections offer unique clothing that helps you stand out with confidence.
Get started with Ortrends and find a graphic tee worth taking care of.
Frequently Asked Questions
Should you hang or fold graphic tees?
Folding is the safer default for graphic t-shirts because hanging puts tension on the neckline and shoulders, which can stretch knitwear over time. Fold graphic tees for drawer or shelf storage to keep the print flat and the collar intact. Hanging works if you use padded hangers and fold the shirt over the bar instead of pulling it over a hook. Reserve hanging for short-term use or display pieces, and fold everything else.
Does folding graphic tees damage the print?
Folding itself does not damage the print, but creasing directly across a screen print can cause cracking over time. Fold along the sides and sleeves rather than through the center of the design. Use the cuff tuck method so the printed area stays on a flat surface with no sharp folds. For long-term storage, add tissue paper between stacked shirts to reduce friction on the graphic.
How do I keep graphic t-shirts wrinkle-free in a small closet?
Use vertical storage instead of stacking. Fold each graphic tee using the ranger roll or upright file-fold method, then stand them side by side in a storage bin or on a shelf. This reduces overcrowding, which is the main cause of creases. Keep the closet layout breathable so air circulates, and avoid compression from heavy stacks. A hand steamer handles any light wrinkles before you wear the shirt.
What is the best way to store graphic tees long-term?
For long-term storage, wash and dry the shirt completely first, then fold it with the graphic facing inward to protect the print from friction. Place folded shirts in breathable storage bins, not vacuum-sealed bags, which trap moisture and stress the fabric. Add a moisture control packet to the bin. Store in a cool, dark space away from direct sunlight, which fades screen prints. Check the bin every few months for moisture or pests.